Showing posts with label paint. Show all posts

Friday, June 17, 2011

Field desk - part 5 - Painting and trim

The painting and trimming of the field desk.
Painting was straightforward...
Undercoat,
filling,
masking and
top coats of "Bender grey" (the darker grey used to paint Bender's arms and legs)

In keeping with the Futurama theme, and tying in the fact that this desk is designed and made for use in electronics and microprocessor experimentation, I decided to theme the trim on the concept of the desk being a "Momcorp" product, a prototyping/ repair kit for Momcorp products using microprocessors.
From that concept, it wasn't too hard to look at this as an "Experimental Brain Surgery Kit" (Always wanted a tool box with that written on it!!!) for robots and robotic devices.

Figure 1 - Momcorp logo pages drying after clear-coating and spraypainting
I created a version of the Momcorp logo (The nicer one, not the authoritarian vertical MOM one) and decoupaged it to the front and back of the desk. I printed the logo I made on the thinnest paper I could find, then spray painted the back white to increase the opacity -  I clear coated the front to stop the ink running.

Figure 2 - Decoupaged logo on door of field desk

I then got to thinking... if I was in the year 3xxx and a technician, I wouldn't leave my travelling toolbox looking so bland. It would have stickers on it ....
  • from places I'd been authorised into (HAL institute for criminally insane robots), 
  • stickers from products (Mom's old fashioned robot oil, bachelor chow, slurm), 
  • stickers which reflected the world around me (political, social fads, social commentary, humourous), 
  • and at least somewhere I'd have my name.
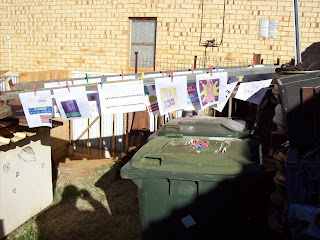
Based on that, I started cruising the internet finding images from the show, and editing them into a sticker style format. I found a few in that "cafepress" site which were already done, and used their look as my template. I downloaded a few fonts, and made a few (how I made the Momcorp logo) and then printed them in my inkjet printer.
Figure 3 - several pages of "stickers" drying after painting
All of the "stickers" where clear coated over (to stop the inkjet ink running when varnished), and most were spray-painted white from the back to improve the contrast and opacity - but not all. A few of the images were deliberately scuffed and aged just to add a "worn look" to them. - given the less than perfect cabinetry, a few bumps and scratches here and there will be well and truly "in character: A couple of the stickers were not painted white from the back so they'd appear to be made from newsprint paper... just for variety.
Figure 4 - Back of Field desk with stickers applied
Stickers include: The vitruvian robot drawing, robo-fresh, the feminista bumper sticker, WWZJD.....
Figure 5 - Door of Field desk (Outer side)
several Slurm stickers, Mars University, Scary Door, a binary expression....
Figure 6 - LHS of Field Desk
Nixon's reelection campaign poster, robot oil sticker, "I love Snu-Snu" bumper sticker (who doesn't?)....
Figure 7 - RHS of Field desk
A hypno-toad sticker, a trekkie bumper sticker, robot oil ad, more slurm.....
Figure 8 - Top of Field desk, including "protest sticker"
more Slurm (it really is addictive!!!), the Earthican flag, a "Morbo" bumper sticker, HAL institute sticker, a NNY sticker, and a "protest sticker".
The protest sticker was written up in the Futurama "alien" font - it's the font used throughout the show. I won't give out the meaning, but it's a very well known sentiment amongst those whom nanny-states will try and govern.

That's it for the trim - I did have a bachelor chow sticker, but it got damaged during painting (Wind got it while it was wet) - I was going to put a DOOP sticker on as well, but it was starting to look cluttered... we'll see.

All that's left now it to show the unit with the contents in it. That article is as much for the PICAXE forum as any other groups since they helped me with the shopping list of things going in there.

Thursday, June 16, 2011

Field desk - part 4 - Tray and lighting (additional information)

A little more information on the lighting, and a quick article concerning the tray for the top shelf.

About 5 minutes after finishing part 3 of this series, I was filing the folder for that article when I found the additional photos I took as part of the lighting design...
Figure 1 - Lamps tested for use in the desk - LED lamp on left, incandescent on right
Photos of the two lights I trialed, including the LED lamp I used in this project, and a photo of the desk with a piece of DIN rail used to measure length and placement of the lamp.
Figure 2 - Trial of lamp placement using DIN rail

Paper Tray - Top Drawer
The other photos in this article cover the construction of a "paper tray" which is designed to fill the top shelf of the field desk. I plan on keeping an A4 notebook, CDR (with manuals), a couple of pens, etc in that shelf. The easiest way to achieve this is to have a drawer.
Figure 3 - Sheet metal cut out, prior to folding
The paper tray is simply folded up from sheet metal (more of my salvaged colourbond "signwhite") to make a simple tray, with a folded top edge on three sides, and one extended edge on the front. This extended edge forms a handle which allows the drawer to be pulled out from the shelf.
Figure 4  - Drawer in place on shelf
Since I haven't had the time to build a finger brake yet (still on the ever growing "things to do" list), I did all folds using the clamp over bar, wood and hammer method. One thing I found during that exercise was that you shouldn't hammer anything whilst you have a cold - all it does is screw up your inner ear whilst your sinuses are stuffed - Not a nice sensation.
Figure 5 - drawer painted
Once folded up, a couple of pop rivets to hold it all together and then it's painted up in "Bender Grey". In fact the entire exterior of the desk will be painted "Bender Grey" and will carry a suitable theme in the trimmings.
Figure 6 - Finished drawer showing folded handle on LHS
The painting and trim of the field desk itself will be the next article, then all that's left is a brief discussion about contents and that project is complete.

Friday, September 10, 2010

Jeanie's Bottle

I know, I know... I promised myself I'd keep this up to date, and regularly updated... plans of mice and men. Lots of things to blame, but ultimately it rests with me to update this record more often.
Over the past month I've probably spent a whopping total of 12 hours in the shed, and 4 of those hours was for someone else's benefit...

To partially redeem myself from the lack of updates, here is the documentation of a project I did 18 months ago (or so)

My wife is a fan of the TV show "I Dream of Jeannie".. for those with more money than I, you can purchase reproductions of the Jeannie bottle... I didn't have the money to spare so I looked at making one for my wife.

I started with some ceramic blanks purchased through Ebay - the original bottle was a glass bottle (Jim Beam 1969) modified and painted up by the studio, then after the success of the show, Jim Beam issued a regular run of the glass bottles for collectors - they go for around $80-100 USD on Ebay... the ceramic blanks cost around $25-35 USD each.


Figure 1. Ceramic bottle blanks

The blanks arrived (after some hiccups with post) and I primed and sanded them several times using automotive spray primer, and 600-800 wet and dry paper.


F
Figure 2. Primed bottles in box

The bottles were stored in a cardboard box whenever the paint was drying, or not being worked on.. partly to prevent dust settling on the paint, but also to prevent the bottles from being seen by the recipient. Typically whenever I make a present for my wife (or children) I will make it in secret, and only give it to them once it's completed.

After suitable layers of primer and sanding, the bottle was spray painted with 2 coats of cheap gold spraypaint (for base colour), then 3 layers of metallic gold paint. The final coats of gold were supposed to be able to give me a polished gold finish - it came out more like satin over brass, but that was OK... the "original" bottle would have been enamel over brass, and that was the effect I was trying to achieve.

Then started the painting of the colours - I started with some thin coats of a translucent purple so the gold/brass could come through, then added opaque detailing.

 Figure 3. Bottom of bottle showing base "gold" coat under translucent colouring.

My guide to colours and placement was a number of photos taken from the web, and a $5 painting/template guide I purchased on Ebay - Apparently there are about 5-6 different bottles shown on the show (Jeannie - Season 1, Jeannie -  the rest of the seasons, then other characters) This paint scheme is the "Jeannie - Season 2 onwards" colouring.

 Figure 4. Colours applied according to the painting guide

Adding the detail was painstaking at best. I've never used brushes so fine, and I never realised how much my hands shake when doing this kind of work. I had to rub back the work here and there, or paint over the occasional error, but generally it came out OK.

Once completed (or as close as I dared) I then started applying coat after coat of clear decoupage varnish over the entire thing to seal it all, and to add some slight gloss to the finish.


Figure 5. Varnish drying on finished bottle.

Once completed I wrapped them up for a Christmas gift. Below is the photo she took after unwrapping them. Everything we own is photographed for insurance purposes, and typically on our kitchen table.

Figure 6. Finished bottles as unwrapped.

One day I'll figure out how to make and fit a Barbara Eden in the bottles, but until then, I'll continue working on making my own (and my wife's) wishes come true by hard work instead of a "blinky head nod".

The paints were predominantly "Jo Sonia" glass paint, and folk art paint, and the spray paints were those left over from model rocketry.
Hours to "build" was in the order of 50-60 hours of work, plus about the same again waiting for paint/ varnish to dry.


Projects coming up:
MOT spotwelders, indicator stand repairs, taper turning attachment construction, lathe stand/motor construction just to name a few.

Monday, April 19, 2010

Bender's Beard - or is it Flexo's?

Fans of the show know Bender has a beard, but "never wears it". When we first meet Flexo, the key visual difference between Bender and Flexo is the beard.
To make a beard... When I was making the eyelids for Bender, I tipped any leftover putty into a quick cardboard mold I made.

The mold was basically a triangle, with a thickness of around 42mm (1 3/4"). Since it was done as two pours, I placed a magnet inside with it's poles facing the base of the triangle, between the first, and second pour.

Once cured, I cut the mold apart, and then cut the triangle section apart to form Bender's beard - as seen below.

The followed a lot of filing, and adjusting so the magnet poles were exposed, and the triangle cleaned up so it was even, and had sharp lines at the edges. Once happy with the look, I primed the beard as shown...

Originally I painted it the same light gray as Bender's body and head, but my darling wife pointed out it looked wrong. I checked the disc again, and sure enough it was too light (She is always right, but don't tell her I said that...). The beard needed to be darker than the colour of Bender's extensomatic arms, so I gave it a shot of the Zinc-It.

Front view...

Three quarter view...


That'll be it for a while.. Bender is pretty much complete. I still want to do up a bottle of "Ole Fortran" for him (does anyone else remember FORTRAN?... I can still remember coding in FORTRAN 77 and FORTRAN 90 - first language I ever used which didn't have a "print" statement of some description.)
I digress... I want to do up a bottle of booze for him, and try and recreate the kids' drawing from the orphanarium. At that point, Bender will definitely be finished.

The suggestion has been made that the next project should be the Robot Devil... I'll admit he looks great, and would be a challenge. I think I'll hold off for a while - never a shortage of jobs to do, and I'd like to document some of my other projects.

Bender starts smoking.

To make a cigar for Bender.... Ideally it shouldn't fade, and should look reasonably "realistic", or at least as real as Bender does.
I started with a short length of 20mm (3/4") electrical conduit, with a magnet taped into on end.
I also grabbed some empty chip packets (Samboy BBQ) for the orange colour, and the "sparkly texture"


To simulate the burning/ glowing end of the cigar, I cut the chip packets up to get 50mm (2") wide strips of orange material, folded them lengthwise so no silver showed, and rolled them into a tight roll to place inside the end of the conduit - shown below.


I then rolled a wider strip around the outside to cover the end of the conduit, and taped this in place. The rest of the chip packet was then folded into itself to form a 60mm (2 1/2") wide strip, and wrapped around the conduit to widen the middle portion of the cigar. I then wrapped the whole thing in tape to form the cigar shape, and leave the orange exposed.


Once the taping was finished, I painted it Brown, and let it dry. The photo below shows the painted cigar drying - stuck by it's magnet to a cabinet.


I then added the black spiral lines to the cigar using the gridding tape (see article on teeth) and gave the cigar to Bender - he seems to enjoy it.

Next article will cover the beard.

Bender gets emotional - part 2

As mentioned previously, Bender displays emotions via his eyelids, and to a lesser extent via his teeth - specifically the horizontal lines. To that end, I made some extra teeth panels when I first finished the heads, and reserved three of them for "emotional effects" - this page documents finishing two of them.

The teeth panels are simple rectangular panels cut from colourbond offcuts. Colourbond is a common roofing, and fencing steel, about 0.6mm (about 25 thou) thick, and quite "springy"... it'll crack if you attempt to put a sharp bend in it since the way it's shaped hardens it considerably.
This springy-ness is used to hold the panel inside Bender's head - as shown in the photo below.


The two "ears" bent into the teeth panel make it easier to spring the teeth panel into a tight curve to insert and position the panel.

Knowing how difficult it'd be to mask up some nice curves, I acquired some of the adhesive tape used for putting gridlines on whiteboards and tried using that to make some wavy lines (Bender's "error" teeth pattern) - it worked OK.

A second line added..


I also tried some sharper wavy lines to recreate Bender's look when shocked - that didn't work as well since the tape couldn't turn sharp corners without puckering. I ended up pulling it off and creating the shocked lines with black paint free handed on to the panel.


Here is the finished panel installed in the spare head - "error"

And the "shocked" look...
Next installment should make Bender happy - he gets his cigar, and a beard he "never wears".

Bender gets emotional - part 1

For Bender to display emotions he usually has his eyelids change, or his teeth change (horizontal lines only)
To make some eyelids for Bender I cut up the eye molds I'd used - made from Christmas decorations. In the photo below, you can see two halves of a Christmas decoration which were used for eye molds, and one still complete decoration.

I removed the eye-plate (with eyes) from the spare head, and using a discarded plastic tag, made a dam for the putty. I cling wrapped the eyes and plate to prevent the putty from sticking, and positioned some cut decorations on the eyes with their centres at 1:30 for the "sad" look, and at 10:30 for the "frown" look. I magnet was placed at the top between the eyes, and a piece of metal was placed for a handle into the putty before it cured.

Once the putty had cured, and the dam, and cling-wrap removed, the resulting eyelids were filed, carved and generally cleaned up. In the photo below, you can see them stuck (via their magnets) on a metal cabinet.

Once painted black (to match the interior of the eye shroud, and eye-plate, the eyelids were tested. The "frown" first...
Then the "sad" expression...

The next installment of this build log will cover the other emotional accessories I built, teeth plates.

Bender Gets Religion

Given that smoking isn't something I encourage in our house, I thought it fair to give Bender a good behaviour. He was quite well behaved when he had religion in "Hell is other robots" so I made him a Robotology symbol.

I started by drawing up the symbol, tracing around a 20cent piece for the dots, and scaling everything else so it looked in proportion.


I then traced it onto a piece of sheet aluminum from an instrument case in the scrap bin. To trace the design I painted the aluminum with cheap white paint (for contrast), and coloured in the back of the paper with the design with red pen, I then went over the design from the front, transferring the red ink onto the white paint. I then went over the marks with the red pen to contrast it better.


The shape was cut out with shears, hacksaw and filed to shape. I then primed the shape, and glued some magnets to the back with rubber cement.

A second coat of primer on the front to smooth any drips, and soften the edges a little


I then sprayed the symbol with a "cold galvanising" spray called Zinc-It. It's a CRC product one of the boilermakers from work put me on to. My Dad used to have a paint on version he used when making gates, so when I was given a can of spray zinc, I use it on all my work where I want it to last. Here I only used it for the colour, and the fast drying aspects. - The finished result...


One well behaved Bender

Next installment.. eyelids

Sunday, April 11, 2010

Painting Bender

Painting Bender was surprisingly quick. The hot weather here helped the paint dry really fast, and in some cases was too quick (brush marks drying before the paint could settle)

First step was applying primer , light sand, second coat of primer. Each coat needed time to dry, and I hung the parts between 2 ladders for them to dry without contacting anything. The photo below shows the parts hanging in the shade in front of my shed. The ladders have permanent hooks mounted in the roof rafters, and the ladders are chained in place for security. A pedestal fan was rigged on the bench (under the covers to stop paint dripping on everything) to move the air under the verandah away from the kitchen window so the paint smell didn't go in the house.
After the 2 coats of primer (with light sanding), the finish coats were added. Bender essentially is painted with only four colours...

a light grey ("fog hat grey" he calls it in Episode 15, Series 4 - The Farnsworth Parabox) for the body, head, feet, and hands,

a medium grey for all "moving" parts (extensomatic arms, legs, and the tapered shaft of his antenna),

an off-white colour for his eyes and teeth,

and black for detail lines.

In the photo below the finish coats have been applied, the arms are darker than the head, chest door, and hands hanging near them.

Even though the fingers move, Bender is always shown with his finger the same colour as his hands, so I've done the same when painting him.


The colours I used are:

Off white - 200% "Hog Bristle"

Light Grey - Taubmans Shaded Grey

Medium Grey - Taubmans Oyster Bar

and low gloss Black


Once the finish coats were dry, I masked the segment lines on the arms and legs, and painted them black.
Other things painted black, the interior of the body, and both heads, the eye-plates, the interior of the eye shrouds. I also painted the bolts, nuts and wingnuts used for attaching the arms and legs black so they would not be obvious inside the body.

I also masked up the lines on the teeth panels, first the six vertical lines and let them dry. I made 5 teeth panels since I plan on making some with different expressions. In the show (Futurama) Bender's facial expressions are always conveyed by means of his eyelids, pupil level, and the horizontal lines on his teeth. The vertical lines remain unchanged despite his expression.

I masked the square pupils on Bender's eyes (pupils are 14mm x 14mm) centrally on the eyes, and assured their orientation by masking the eyes on the eye-plates with the horizontal masking tape going across both eyes so they were level.

I masked 2 of the teeth plates for simple horizontal lines, masked them up and painted them as shown above. NB - The teeth plates are resting on another "mini-project" - a storage container for the car cover. The red lifting handle for the lid is one cut off the NuSwift extinguishers used in making Bender.
Not all painting was done with masking... I simply used careful brush work to bring the medium grey of the shaft to the light grey of the dome and ball of Bender's antenna at the intersection of the parts. I used similar brush work to paint the feet light grey, and the legs medium grey. The transition between the two colours at the feet were later covered when I masked and painted the segment lines on the legs.

Last article on this project yet to come... Assembling the finished Bender!!!