Showing posts with label sewing. Show all posts

Monday, April 25, 2011

And now for something completely different - some quilts I made

Just for something a little different - much different than driving the lathe.

Everyone who knows me knows I have a myriad of interests, and will have a go at just about anything. I started sewing properly back in 1990, and have dabbled ever since. I've no plans to make a career out of it, but I've already saved a lot by doing alterations and repairs. Here is some photos of the two quilts I've made, or helped make.

Gift 2004 - Noah's ark quilt 1330 x 1560mm in size

Central panel hand quilted by my wife  - panel is one of the preprinted style available through the fabric stores.
Surrounding panels have a set of themes.
The two side sets (vertical set of 4 panels per side) are the land animals
The top set of panels (5 panels) are the animals of the air (birds and bugs)
The bottom set of panels (5 panels) are water animals.


The borders to the panels sets are made in the colours of the rainbow and orientated to form a circular pattern around the ark.
The corner panels also have a theme which commences in the low RH corner and is read in a clockwise direction.
Low Right Hand Corner - the rains commence and the waters start to rise
LLHC - the rains continue and the waters are significantly higher
ULHC - the dove brings back the olive sprig
URHC - the waters recede from off the face of the earth

All panels with the exception of the large central panel are made from machine based applique methods.
All fabric is poly cotton - pre-shrunk, and sewn with polyester threads.

The rain in the lower corner panels is over-sewn with a silver metallic thread for effect.

A sample of some panels are shown in the photographs


The panels were designed by downloading images from the internet of animals (I found colouring pages to be the best for size and line detail), or I simply drew the images myself. I then made the applique pieces, turned them, and sewed them in place to create the panel. Detail such as leaves, bubbles, etc were then added, and the panel completed.


The dove was particularly painful due to the colours of the rainbow.


I did a dragonfly, and used a chinzy tule to make it's wings so they retained their translucent effect... that was interesting to sew.


The quilt was made as a gift for my wife's best friend, and we both considered the effort we put into it time well spent for the recipient.

A quilt which I made for my beloved wife...
2006 - "Friends put a Bounce in your Heart" Winnie the pooh - 2100 x 2300mm in size

Started with a picture I downloaded from the internet which I blew up by clipping a sheet of builders plastic (orange translucent sheeting) to an overhead projector screen, and then opening the picture in a PC connected to a data projector.
Then it was simply a case of tracing the projected image onto the plastic and using that drawing for my cutting pattern.


Fabric was standard polycotton - preshrunk, sewn with polyester threads.
Style was normal machine applique.
 At this stage the tracks of the bees and butterflies form the only quilting in the border panels.
The corner panels are each quilted with one letter of "POOH"


This quilt was made during a holiday where my wife left town to visit family, and I built my furnace - My better half was gone for about 8 days, and I would get up each day and work on the furnace from 7am until 2pm, then clean up and work on the quilt from 2pm until 11 pm. I think I threw in a couple of full days 7am-11pm) as well just to ensure this was done before she returned. It then sat in storage for a few months until it was given to her for a Christmas gift.


There is a panel stitched into the back with the title and dates of the quilt.

Equipment:
I have 2 sewing machines, and one overlocker - All I'm missing now is a table tennis table so I have a large foldup surface for laying out patterns and pinnings. Currently I use old doors on saw horses.
The sewing machines are nothing fancy - an old Elna air electronic I purchased secondhand, and a cheap Toyota which we bought when the Elna was looking like it was struggling repairing heavy fabric clothes (denims) - both machines have functioned flawlessly as long as we look after them.

I don't make quilts often - too much on "the list" as it is, but I'm often sewing at least once every month or two doing clothing repairs, or making some little doo-dad. Two weeks ago I made some ID card holders since the one I use at work fell apart and I blamed it on the poor design... let's see if my new design lasts longer than 3 months, then I can skite about it. My multimeter case worked well and has held up for quite a while now without concern.


This is how the kitchen table looked whilst I was making the panels for the Noah's ark quilt... another reason why I don't make quilts too often.


Many many thanks to those people who have taught me various sewing tricks over the years... Mostly Lyn for first teaching me how to use a sewing machine, then Rosemary for first teaching me how to use an overlocker, and Myjalessa for all the fancy tricks. I know I've missed others, but those three certainly started me off with this.

Monday, November 1, 2010

Santa costume - pants - part 4

let's wrap up the Santa Claus costume...

Pants - nothing spectacularly different there compared to the jacket - although there is one sewing tip worth pointing out...

Want inexpensive broad loom calico for projects? Look at Ikea. Ikea sells a quilt cover made of full width calico for about $8. That gives you 2 pieces of calico the full width and length of a QB quilt... in dollars per metre it's by far the cheapest calico I've ever found, even at the 900m width. Whenever I venture near an Ikea, a few of those quilt covers are always on the list, just for the cheap fabric. The SB cover is called "Bomull", I'd have to look up the QB sized one, but they're usually next to each other in the shop (says Des who hasn't been in Ikea for over 12 months...) IF it saves someone else money, it was worth putting here...


Figure 1. Cheap calico courtesy of Ikea

Basically the pants (I made two pairs) were made using the velour material and the patterns generated. I then lined the inside with the calico, and made a waistband of red polycotton.
The waistband has a drawstring channel in it, and suspender points.


Figure 2. Velour outer being pinned to calico liner

Originally the suspender points were simple tabs which the jaws of the suspenders could affix to, but during test wears I found the jaws would occasionally let go - to beat this issue, I added a small tab at the front with a button, and a larger tab at the back with a corresponding buttonhole. The suspender jaw grips the original tab, and then the buttonholed tab is fed through the loop on the jaw, and buttoned down so it cannot let go.


Figure 3 - original suspender tab


Figure 4 - buttonhole tab threaded through loop


Figure 5. Button tab visible


Figure 6. tab buttoned down for securing suspender


The fur trim added at the bottom has a band of seatbelt material added inside for weighting the cuff downwards, and accentuating the flare of the cuff so the boot is covered better. In the original test fit, the trim would ride up the boot and looked "dorky".. almost like Santa was wearing clamdigger pants. With the weighted trim, the pants naturally fall to the top of the ankle, and ride up only slightly when seated.
No trim is at the waist since it's under the jacket, and would make adjustment with the drawstring harder.


Still to cover... belt, and hats. I'll most likely wrap them both together just to get this documentation finished.

Thursday, October 7, 2010

Santa costume - jacket - part 3

The jacket was made by cutting out the panels for the back, front panels, and sleeves as per the pattern developed in part 1.

The lay of the fabric was maintained based on the arrows in the patterns. Once sewn together, the lining was made from standard polycotton (as used in making applique quilts) using the same patterns, and then placing it inside the jacket with all seams facing inside the jacket.


Photo 1 - cutting fabric from pattern

The collar of the jacket needed to stand up so any clothes worn under the jacket will not show, I decided the jacket collar needed some stiffening. I designed a flat collar which resembles a mandarin collar from the back, but lays flat as it comes down the front panels.
The stiffener material I used is some seatbelt webbing I salvaged from some of the road-crash training cars.


Photo 2 -  Seatbelt and fur trim for collar and it's stiffening


I cut the seatbelt fabric to make the collar higher at the back, and tapering down as the collar crosses over at the front.

The liner was inserted inside the jacket outer, and pinned in place. This allowed for minor adjustments in fit, and the positioning of the internal pocket for the gloves which was sewn in place prior to joining the outer and inner together.


Photo 3 - Jacket outer and liner pinned together

I then stitched this into the fur trim and then stitched this into the layers between the jacket outer, and the liner. This was accomplished by turning the jacket (with it's liner) inside out, and stitching it all together, but leaving a turning area of about 300mm (12") unstitched at the back of the jacket.


Photo 4 - Fur trim pinned in place for sewing into jacket layers

Once the sewing was done, the jacket was turned "right side out" and the turning opening was closed by careful pinning and sewing. To reduce the appearance of the closed seam, I used a derivative of the bias tape method, where I sewed the fur trim to the outer, then reversed the lay so it sat properly and then over-sewed the seam with the liner held in place with pins, this concealed the stitching for the outer/trim seam, and allowed the seam for the liner/trim to be hidden in the seam of the first set of stitching - sorry no photos to simplify the description.


Photo 5 - the finished jacket showing the liner in place

The photo above (photo 5) is where I was trying to determine if a single width belt looked OK, compared to a double width belt.

The pants were made in a similar manner, but will be covered in another posting.

Santa Costume Finished - Part 2

Well the santa costume is done...
There will be more parts put up to show how the costume was made - stay tuned..

The costume comprises:
1 - Jacket with cross-over front panels, internal lining, internal pocket (for gloves), shaped collar, fur trim
2 - Pants - lined, with drawstring and suspender tabs, weighted shaped cuffs, fur trim (2 pair made)
3 - modesty panel under jacket
4 - belt with brass buckles, and attachable "pouch" for lollies, keys, phone, etc
5 - Hat - 2 made, one traditional, one "special"
6 - Boots
7 - Gloves
8 - Beard and wig


There will be pages made for the pants, jacket, and belt so I won't discuss them here.


Photo 1 - showing the traditional hat

The boots are an old pair of structural fire boots (tread worn away to nothing) which I polished up and they're now in the costume set.
The wig and beard were a set I bought on E-Bay
The modesty panel is basically a large calico bib which I put on under the jacket - it's sole purpose is to prevent my shirt showing through the beard between the front panels of the jacket. Last year I went straight to a "santa run" from work and my bright "safety orange" work shirt was showing through the beard - not a good look for Santa. I deliberately wore the same shirt in these photos just to make sure the costume completely covered my clothes without ruining the look.
The belt pouch is simply a lined bag with belt loops which can be threaded onto the belt so Santa has an external pocket for stowing lollies (candy), keys, mobile phone, etc


Photo 2 - the costume

The hats were fun.
I'll probably do a page on the hats, but some of the photos didn't work out so there will be some gaps in the documentation.
Basically one hat is the typical design - about 600mm (24") tall, whereas the other is 1800mm (72") tall. The second one was a fun piece I made to try a theory about a hat also being able to be a scarf. Both hats were made from the same crushed velour fabric that the jacket and pants were made from, and used the same fur trim for the brim, and the pom-pom. Both hats are lined as well.


Photo 3 - Santa with the longer hat

Since Bender kept me company outside whilst I was sewing, it's only fair he gets to try on the hat...


Photo 4 - Bender modelling the scarf-hat

Since I don't have a large model of the Santa  Robot, this will have to do...


Photo 5 - Santa and Bender - not menacing at all

I'll document the jacket, pants and belt over the next week (time permitting) and then get back to documenting (and working on) the MOT spotwelder, and a few other projects I'm trying to clear off the "to do" list.

Project costs (AUD):
about $80 for fabric
$30 for the beard and wig
approx 50 hours of sewing, metalwork, etc
maybe $10-20 for incidentals (power, threads, gas, etc)

The day after I completed this project my wife pointed out a costume for sale in one of the online clearance sites... the costume cost about $80 shipped, but it was a thin felt set - the type which only last 3-4 wearings before falling apart... I'd like to think this costume will last many many years so I hardly begrudge the costs in time or money.

Saturday, May 8, 2010

Customised Meter Case - & musings

Before I get into this little project, I just want to say how happy I am Daria is finally coming out on DVD. I've bough the various box sets issued over the years by various companies, but all of them were simply DVDs cut from the "Sarcast-a-thon" showing, complete with the original music, and various station markers, and glitches.. but still Waaayyy better than nothing. But come 11th of May 2010, MTV is releasing the Daria DVD box set - still no news on the music, but again - better than nothing. I'll be buying my copy from Amazon due to the price - Here


The other musing was trying to pick a suitable photo for my profile. There was no way on earth I was going to put a photo of myself up there (It's offend the internet spirits for sure) so I was thinking about suitable "archetypes" I could use... some of the candidates included "Q" (Desmond Llewellyn) - from the James Bond franchise, "Tobermory" from the Wombles, Macgyver, Eeyore, and Alastair Cookie, and I even considered Erik (the Phantom of the Opera), but then I kept coming back to this one choice.... This man displays all the qualities and attributes I'd associate with - quick witted, intelligent, inventive, and a great many other characteristics I wouldn't dare include on a resume such as devious, megalomaniacal, and unassuming dress sense. He's Graeme Garden from the Goodies - if you missed out growing up with the Goodies in your life, take the time to get some episodes and see what the fuss was about. If you know the Goodies, you'll know and love "Graybags", even if you associate more with Bill or Tim.


On to the project...

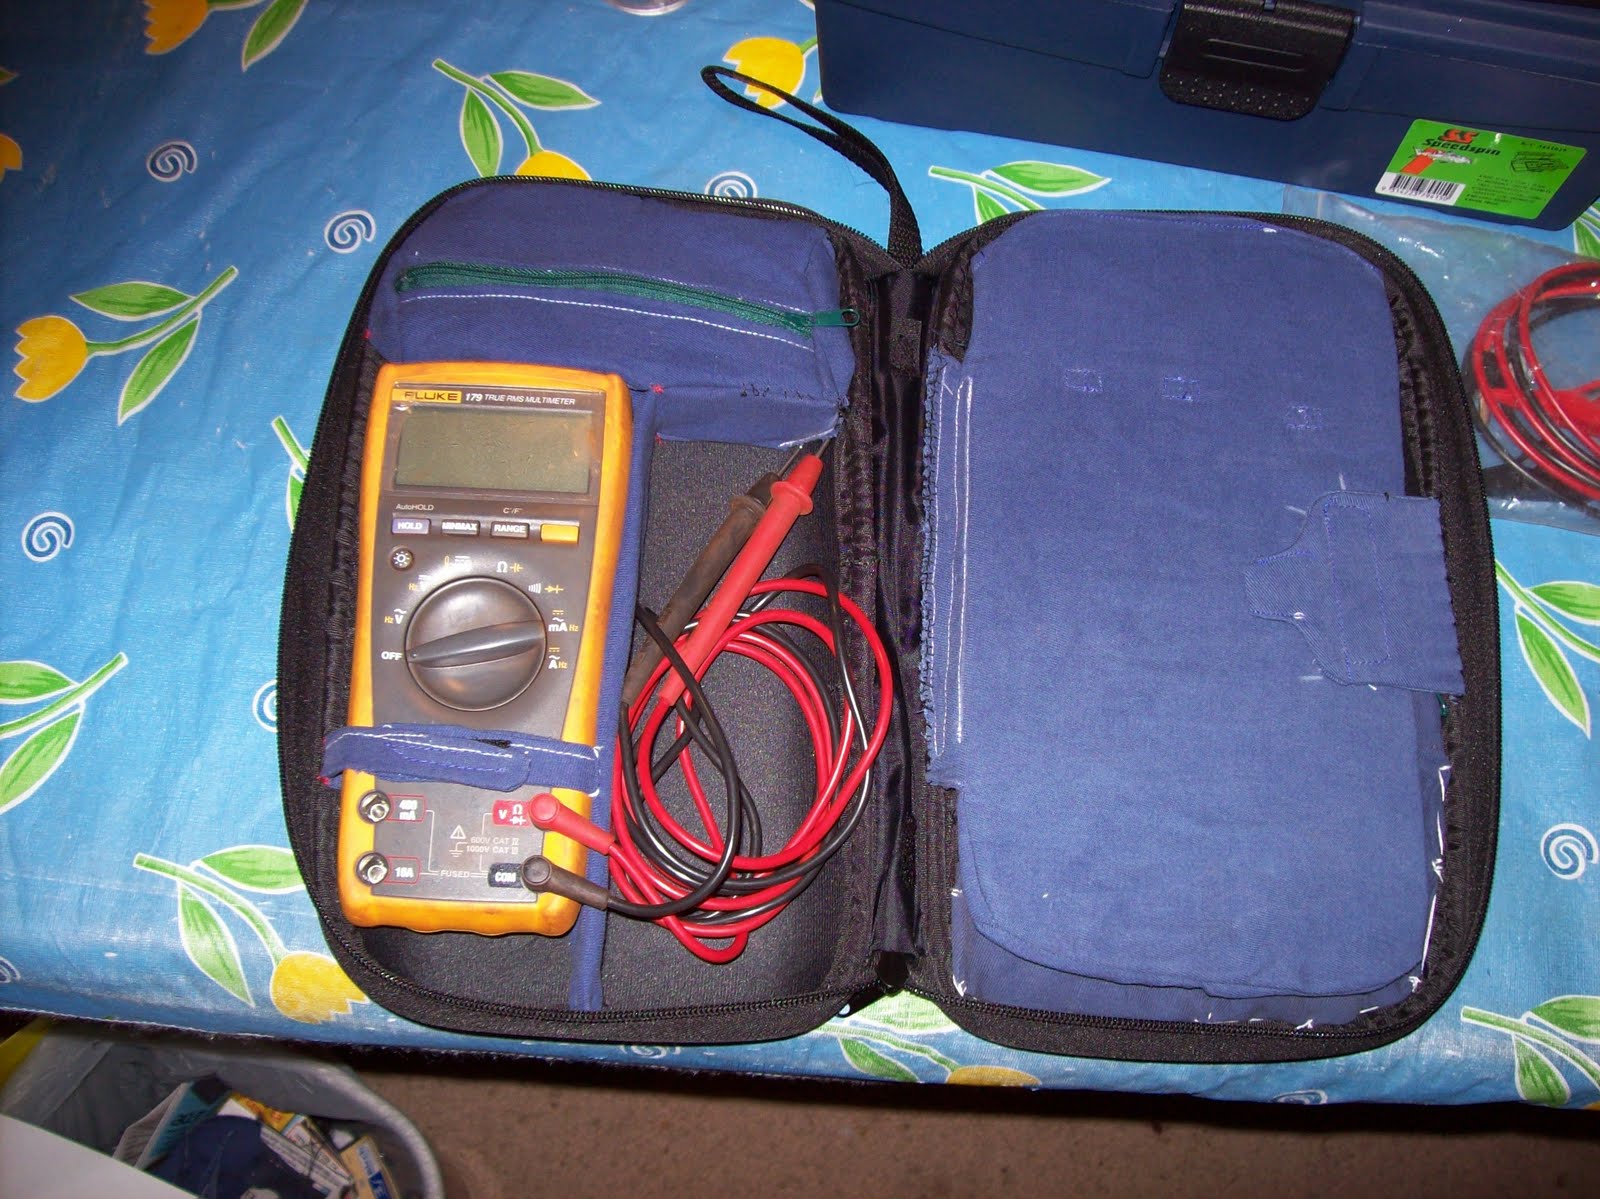
I use a Fluke 179 DMM (Digital Multi Meter) as part of my work, and carry a number of leads, clips, and spares for the meter. One of my co-workers had a case which had the meter on one side, and the spare leads on the other, but I could not find anyone offering the case, and he'd had it for years. I got sick of carrying two cases to jobs, and so decided to make my own case.

I started with a CD wallet for the local Kmart store (big variety chain store - viz Target, or WalMart). The wallet had a zipper around three sides, and a "clam shell" design based around a firm material covered rubber. All up the case was about 50mm (2") thick when stuffed with cardboard.
The CD wallet is shown below...


I removed the CD sleeves, and salvaged the velcro strips used to hold the sleeves in place. I purchased two "cheap and nasty" pencil cases ($1 each) just to get cheap zips, and purchased a cheap roll-up cutting board for the plastic ($3 for 4 boards). The fabric is from some old work shirts that had become too ratty to wear in the shed.
I sewed up a "pouch" to sit above the meter which holds the spares for the meter (fuses, battery, holding clip)


The divider which holds the meter to the LHS (Left Hand Side) of the case is a piece of the roll-up cutting board sewn into a sleeve of cotton fabric. The salvaged velcro is used to secure the meter into the case. The spare space on the RHS of the meter is used to roll the connected leads in for easy use.

The contents of the top pouch are shown below... the brown wire is the K thermocouple used by the Fluke meters for measuring temperature.


The RHS of the CD wallet was separated from the meter section by a panel made from more cutting board plastic encased in another cotton sleeve. The panel is retained by a fabric hinge stitched in the middle of the wallet (White lines of stitching in photo above), and held in place with a velcro closure on the RHS edge. With the velcro closure opened, the panel can swing over the meter to reveal...


The spare leads are vecro'd in pairs to the top section of the panel. The thin black velcro was the last of the velcro salvaged from the original CD wallet.
The pouch sewn into the lower half of the RHS shell contains the spare tips, and probes. The pouch is a simple sewn pouch with another "pencil case" zipper for a closure.


The entire meter case took about 2-3 hours to make including the cutting, sewing, and hand stitching the pouches in place. I've now been using the case in the field for about 6 months and had no complaints about how well it's met my expectations.

A few sewing notes...
threads were typical 100% polyester threads used for normal sewing.
Sewing needle was a normal Smetz universal needle (#15 from memory) and it handled the three layers of cotton, plus the 1mm of cutting board plastic fine.
I used my Toyota sewing machine for this job since it is my current "work horse" machine. I have an old Elna "Air electric", and a Husky 4 thread overlocker, but those only get used when needed.. the Toyota is my "day to day" machine.


I'll post a review on Daria once I have it my hands!!! - Come on Amazon...