Painting was straightforward...
Undercoat,
filling,
masking and
top coats of "Bender grey" (the darker grey used to paint Bender's arms and legs)
In keeping with the Futurama theme, and tying in the fact that this desk is designed and made for use in electronics and microprocessor experimentation, I decided to theme the trim on the concept of the desk being a "Momcorp" product, a prototyping/ repair kit for Momcorp products using microprocessors.
From that concept, it wasn't too hard to look at this as an "Experimental Brain Surgery Kit" (Always wanted a tool box with that written on it!!!) for robots and robotic devices.
 |
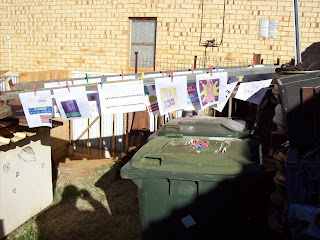
| Figure 1 - Momcorp logo pages drying after clear-coating and spraypainting |
 |
| Figure 2 - Decoupaged logo on door of field desk |
I then got to thinking... if I was in the year 3xxx and a technician, I wouldn't leave my travelling toolbox looking so bland. It would have stickers on it ....
- from places I'd been authorised into (HAL institute for criminally insane robots),
- stickers from products (Mom's old fashioned robot oil, bachelor chow, slurm),
- stickers which reflected the world around me (political, social fads, social commentary, humourous),
- and at least somewhere I'd have my name.
 |
| Figure 3 - several pages of "stickers" drying after painting |
 |
| Figure 4 - Back of Field desk with stickers applied |
 |
| Figure 5 - Door of Field desk (Outer side) |
 |
| Figure 6 - LHS of Field Desk |
 |
| Figure 7 - RHS of Field desk |
 |
| Figure 8 - Top of Field desk, including "protest sticker" |
The protest sticker was written up in the Futurama "alien" font - it's the font used throughout the show. I won't give out the meaning, but it's a very well known sentiment amongst those whom nanny-states will try and govern.
That's it for the trim - I did have a bachelor chow sticker, but it got damaged during painting (Wind got it while it was wet) - I was going to put a DOOP sticker on as well, but it was starting to look cluttered... we'll see.
All that's left now it to show the unit with the contents in it. That article is as much for the PICAXE forum as any other groups since they helped me with the shopping list of things going in there.

No comments:
Post a Comment